This guide will take you step-by-step through installing Eastside Hockey Manager 1 (formerly known as Eastside Hockey Manager: Early Access), downloading updated rosters and addons and starting a new game. If you’re not sure of anything then take a look at our forums: https://www.ehmtheblueline.com/forums/viewforum.php?f=102
Purchasing EHM
EHM can only be installed via Steam and you will first need to install the Steam Client. There are two ways of purchasing EHM via Steam:
- Directly via Steam by searching for “Eastside Hockey Manager” and clicking on the “Add to Cart” button; or
- Purchase a Steam serial code via an authorised re-seller such as Humble Bundle which can then be redeemed via the Steam Client (click on Games -> Activate a Product on Steam via the menu in the Steam Client).
It is well worth comparing the price between Steam and the likes of Humble Bundle as one might be cheaper than the other. The standard price of EHM is US$19.99 / CA$21.99 / €19.99 / £14.99 but it is regularly on sale at a 75% discount (US$4.99 / CA$5.49 / €4.99 / £3.74).
Downloading Addons
Finding Your Installation Folder
Many addons can be subscribed to via the Steam Workshop (click here to access the EHM Steam Workshop) which means that you do not need to worry about manually installing anything. Instead, you simply click on the ‘Subscribe’ button on the addon’s Steam Workshop page and Steam will download and install everything for you. It will even keep things up to date as and when new updates are released. This is particularly helpful for the roster updates as it ensures you have access to the most up to date rosters at all times.
Any addons not hosted on the Steam Workshop must be installed manually. This is a simple process and involves dragging and dropping files into the correct folder. For instance, any manually downloaded roster updates should be placed in [Your EHM Installation Folder]/data/database/[Folder Name of Your Choice]/ – e.g. you could install the 1974/75 Rosters to C:\Program Files (x86)\Steam\steamapps\common\Eastside Hockey Manager\data\database\1974-75 Rosters\. Similarly, any player photos (also known as facepacks or facepics) should be placed in should be placed in [Your EHM Installation Folder]/data/pictures/players/.
Click here for instructions on how to locate your EHM installation folder. If you installed EHM to the default path then you will find it here: C:\Program Files (x86)\Steam\steamapps\common\Eastside Hockey Manager\
Click here for a full list of the various folder locations for manually installing addons.
Any addons you subscribe to via the Steam Workshop can be found at: [Your Steam Installation Folder]\steamapps\workshop\content\301120\. If have installed Steam to its default path then you will find it here: C:\Program Files (x86)\Steam\steamapps\workshop\content\301120/
Roster Updates (aka Database Updates)
EHM comes with a default set of rosters with fake player, team and league names. There are however some community-made roster updates which include all of the real life names, up to date transactions and additional playable leagues (including leagues such as North American college leagues and minor leagues). The two main roster updates are (clicking on the ‘Download’ link below will take you to the relevant link in the Steam Workshop where you can then click on the ‘Subscribe’ button to subscribe and download):
- Premier Pivot Rosters (Download) – These are frequently updated as and when transactions occur in real life, ensuring that you have the very latest rosters.
- TBL Rosters (Download) – These are based on the Premier Pivot Rosters but transactions are frozen as at the beginning of the season. Updates are slightly less frequent.
There are also some retro rosters which are in various stages of development. Some of these are in EHM 2007 database format which means that you first have to import them into EHM (see here for simple instructions on how to import). A sample of retro rosters are:
- 1974/75 Rosters by Nino33 (Download)
- 1979/80 Rosters by Pens66 (Download)
- 1992/93 Rosters by Lawrence97 (Download)
- 1998/99 Rosters by CJ (Download)
- 2000/01 Rosters by TBIF (More Info)
Facepacks and Logos
The Steam Workshop contains a number of facepacks (i.e. player and staff photos) and team and league logo packs. This is the most convenient place to access these packs as any updates will be automatically downloaded. Arguably the most popular logo pack is the Dani9 pack which includes has versions for the Premier Pivot Rosters and the TBL Rosters.
Other Addons
Aside from roster updates, facepacks and logos, there’s a whole host of other types of addon for EHM. Take a look at our Downloads Database for more details.
Editing the Rosters/Database
Maybe you want to add yourself or your local/retro team or league to the game. This is all perfectly possible using the unofficial EHM Editor. A tutorial on editing the database goes well beyond the intended scope of this guide, but there is plenty of information in our Data Editing Forum as well as tutorials and a guide on creating additional playable leagues. Generally-speaking, it is extremely easy to add or edit things such as players, teams and leagues. Editing only becomes complex when you want to edit or create a playable league but, with some experimentation and practice, it becomes second nature.
We highly recommend the following when editing a database:
- Always keep a regular backup of your database, particularly when editing or adding playable leagues.
- Do not edit any databases located in your Steam Workshop folder because any future updates pushed via the Workshop will overwrite your work. Instead, make a copy of the database in your [Your EHM Installation Folder]/data/database/[Folder Name of Your Choice]/ folder in order to avoid any data being overwritten by the Workshop.
Starting Your First Game in EHM
So you’ve installed the game, subscribed to a roster update and maybe some addons via the Steam Workshop and you’re ready to start your first game. Here’s a simple step-by-step to get started. We’ll first briefly cover the Preferences screen and then we’ll head into a starting a new game.
Game Preferences
If this is your very first time running EHM then it is well worth first checking the Preferences screen before you start your first game. If you have already set your preferences then you can skip this step.
When you first load EHM, you will be presented with a main menu screen which allows you to start or delete a game, import an EHM 2007 format database, etc. In the bottom right-hand corner of the screen you will see a number of buttons. Click on the button labelled ‘Preferences’.
Most of the settings are self-explanatory and can be kept at the default. Obviously you should change things such as currency, date format and imperial/metric measurements to whatever you prefer. The most important settings are listed below:
| Preference Name | Recommended Setting | Explanation |
|---|---|---|
| Auto Save | Every Two Weeks | Automatically saves periodically in case your computer crashes or you accidentally exit without saving. Two weeks (or monthly) is arguably a good balance between saving too often (which might get annoying) and not risking too much being lost. |
| Auto Save Mode | Rolling Files | Rolling backups means that the game will keep a copy of your last three saved games each time it saves. This is useful if you need to revert to an older saved game. This will of course take up additional hard drive space. |
| Default Database Size | Normal or Large | We will cover this further below, but the bigger the database size, the slower your game will run and the larger your saved game will be. I typically use the Large setting as I like to have lesser known players in my saved games, particularly if I’m coaching a smaller team. |
| Games Stored | 5,000 | This determines the number of games which you are able to go back and look at in detail in future seasons. The larger this figure, the larger your saved game will be. I keep this at 5,000 which is plenty. |
| Save Compressed | No | Enabling this setting will result in saved games being compressed. Whilst this is not necessarily an issue with EHM 1, compressed saved games in EHM 2007 were sometimes prone to corruption. I would avoid enabling this setting unless hard drive space is at a premium. |
| Save Safely | Yes | This will save your game to a temporary location first before overwriting your old save game, ensuring that your previous saved game remains intact in the unlikely event any problems arise during saving. I highly recommend enabling this setting, assuming you have sufficient hard drive space. |
| Verify Available Disk Space | Yes | This ensures that EHM checks whether this is sufficient hard drive space available before it saves. I keep this enabled but you could disable this setting if you have plenty of hard drive space. This setting has been known to result in an “Unable to write data to disk” error when enabled on some systems so try disabling this setting if you encounter this error. |
New Career Game
Click on the New Career Game button on the main menu to setup and start your new game. This will first prompt you to select your chosen database (aka rosters or roster updates). Clicking on the drop-down menu will list all of the databases you have subscribed to in the Steam Workshop or manually installed into your database folder mentioned earlier. Select your database and click on OK.
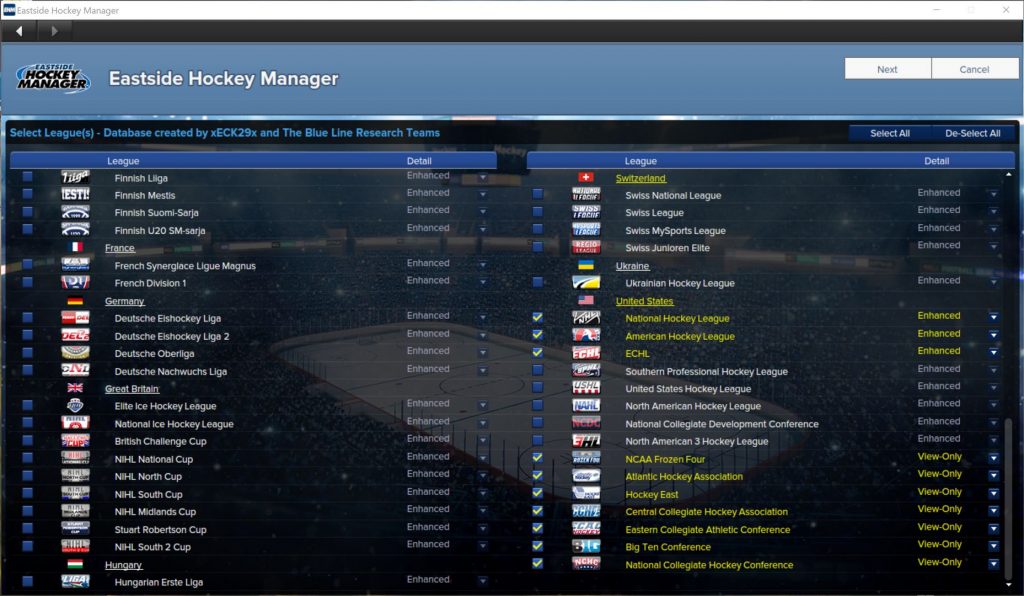
Playable League Selection
This screen allows you to select which leagues are playable in your saved game. You will find that the list of playable leagues is very large if you are using the Premier Pivot Rosters or the TBL Rosters!
Clicking on a nation name in underline text will enable/disable all of the leagues listed for that nation. Clicking on a checkbox will enable/disable that chosen league. Certain leagues require other leagues to be enabled (which will be done automatically for you) and so you might find that several leagues are enabled when enable a particular league. For example, enabling the NCAA Frozen Four will also enable all NCAA conferences.
If you enable multiple leagues, you can choose whether any particular league is Enhanced or View-Only. You can only coach teams in leagues which are set to Enhanced. Any leagues set to View-Only will be simulated to a lesser degree and you cannot coach teams in those leagues. Enhanced leagues require greater CPU/RAM resources than View-Only leagues and so you should limit the number of leagues you set to Enhanced. Similarly, View-Only leagues require more CPU/RAM resources than not selecting the league at all. Consequently you should limit the number of leagues you enable and further limit the number of leagues you set to Enhanced.
Note that you can change a View-Only league to Enhanced or vice versa in-game by clicking on the settings icon (the cog located in the top right corner of the screen, near the date) and then selecting ‘Selected Leagues’. So the Enhanced/View-Only settings you choose when starting your game can be later changed if you find that the game is too slow or you want to change which league(s) you can coach in. However, you cannot enable/disable leagues in-game, so the selection you make when starting your name game is final.
Enabling too many leagues can result in stability issues (this should be fixed for EHM v1.5) and a very slow game speed issues, so we recommend against enabling all leagues. You should be fine to select say 10-15 active leagues, subject to your CPU/RAM. Maybe start with five leagues on Enhanced and then increase or reduce this number in-game depending on how you find the game speed. Further details on the EHM simulation and detail settings can be found here.
If this is your very first game in EHM then perhaps enable the NHL, AHL, ECHL, NCAA Frozen Four and Canadian Hockey League Memorial Cup. Set all of those leagues to View-Only other than the NHL, AHL and ECHL. Then click on the Next button.
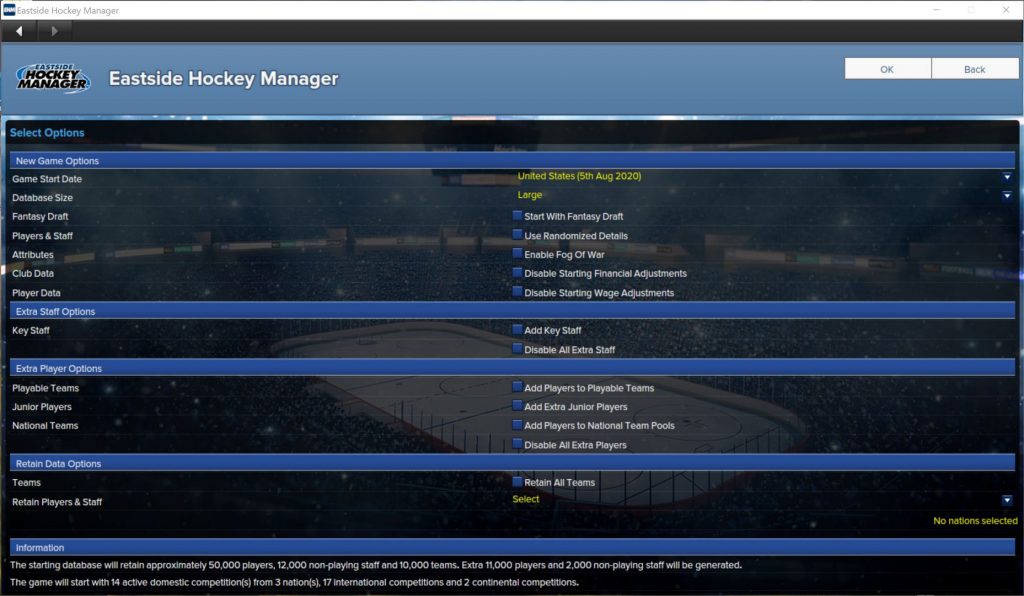
Database Size Screen
This screen allows you to determine the size of your saved game database. The more settings you select, the greater the amount of data which will be pulled across from the database into your saved game. Bear in mind that the amount of data pulled across has a major impact on the in-game speed. Whilst enabling every setting might be appealing, it will make your game very slow.
Suggested settings are as follows. Any setting not mentioned below can be left to the default setting.
| Setting Name | Recommended Setting |
|---|---|
| Game Start Date | Select the nation in which you will be coaching or use the Early Start Date option if you want to start earlier in the pre-season. |
| Database Size | Normal or Large – This has a significant impact on game speed. |
| Attributes | Disable Fog of War unless you don’t want to see the attributes of players on other teams (you will need to scout them in order to see their attributes). |
| Extra Staff Options: | |
| — Add key staff | Enable this option for lesser known leagues in order to ensure that you have key non-playing staff on your team. |
| Extra Player Options: | |
| — Add players to playable teams | Enable this option for lesser known leagues in order to ensure that you have sufficient players on your roster. This will generate fictional/random players. |
| — Add extra junior players | Enable this option for lesser known junior leagues in order to ensure that you have a sufficient pool of junior players. This will generate fictional/random players. |
| — Add players to national team pools | Enable this option if you’re going to coach a lesser known national team. |
Further details on the EHM simulation and detail settings (including an explanation of each setting on this screen) can be found here.
Click on the OK button to start your new game. This will take a few minutes, depending on the number of leagues selected and database size settings.
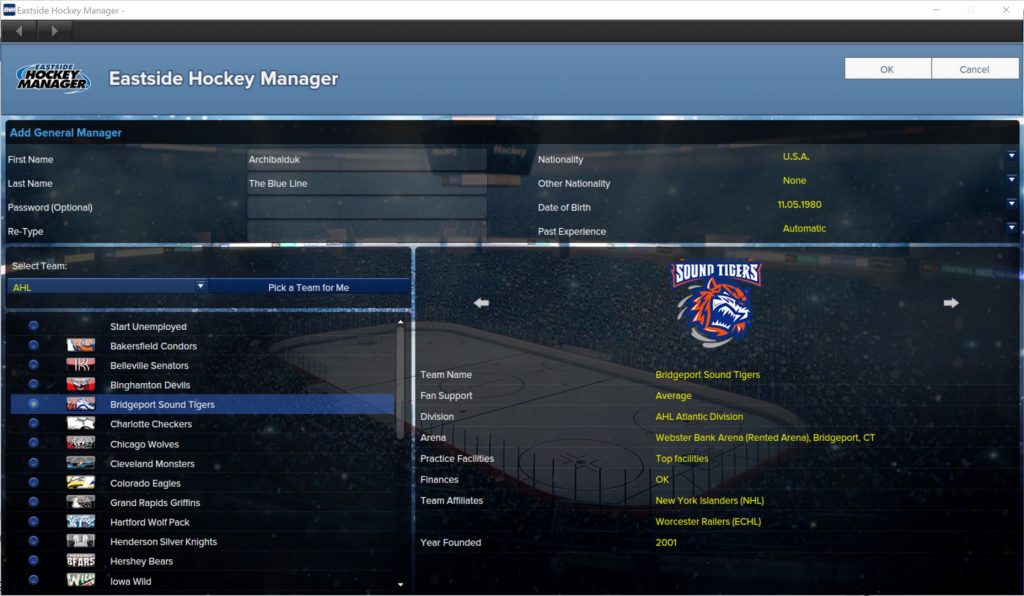
Create Your General Manager
Once your game has been created, you will be prompted to enter your general manager profile details (such as name and date of birth) and to select a team to coach. Click on OK once you have set your profile and selected your team. You will then have the option to add further general managers if you wish. This is useful if you want to coach your farm team in addition to your main team. Click on the Finish button once you have finished adding your general manager(s) to the game.
Next Steps
Your game is now all setup and you’re ready to start coaching! This can be quite a daunting prospect if you are new to the game or to hockey. We do however have some further guides which can help you get started:
- EHM 2005 Guide – This will walk you through your first season in the game. This is still very relevant to EHM 1 even though it was originally written for an older version of the game. The user interface will look a bit different but otherwise the same principles apply.
- EHM 2007 Guide – This is an addendum to the EHM 2005 Guide and covers choosing your line-up and setting your lines and tactics.
- Player Attributes Guide – Explains all of the different player attributes in the game.
- Non-player Attributes Guide – Explains the different non-playing staff attributes in the game.
Questions?
Check out our Eastside Hockey Manager forums should you have any questions.